Here is my step by step guide of how to setup the inky-mbta-tracker. This is a real time e-ink transit departure board for the MBTA (Massachusetts Bay Transit Authority). It supports tracking multiple stations and lines and displays departures based on if you can actually reach them.
Please check Required Components to learn what you will need to buy for this project.
Architecture

Taken from the inky-mbta-tracker GitHub:
At a base level, this project makes use of the MBTA V3 API, especially the streaming API for predictions to setup individual workers for stops which are configured by the user. Optionally, a user can request static schedules via the configuration file (explained below), and there is behavior that will retrieve static schedules if no real-time predictions are available for a stop. From anecdotal experience the V3 streaming API appears to start dropping events after several hours without any errors reported. Therefore, each stop watcher thread making use of the streaming API will restart after 1-3 hours which is cleanly handled through the Python Async APIs.
This project works with inky-display which checks the Redis server a few times a minute to refresh the display. Additionally, the departures can be integrated with Home Assistant MQTT Sensors to create a real-time departure dashboard.
Server
Docker Compose
First, we need to setup inky-mbta-server. You will need a server to run this on and the ability to use Docker/Podman. Here is an example docker-compose file you could use:
services:
  tracker-redis:
    image: docker.io/library/redis:7.4
    restart: unless-stopped
    container_name: tracker-redis
    command: ["redis-server", "--requirepass", "<redis_pass>"]
    volumes:
      - tracker-redis:/data
    ports:
      - "6379:6379"

  inky-mbta-tracker:
    # releases are available at https://github.com/cubismod/inky-mbta-tracker/pkgs/container/inky-mbta-tracker%2Finky-mbta-tracker
    # I would recommend pinning to a specific tag as I will likely update this
    # service over time and may introduce schema changes to Redis
    image: ghcr.io/cubismod/inky-mbta-tracker/inky-mbta-tracker:latest
    restart: unless-stopped
    container_name: inky-mbta-tracker
    volumes:
      - "<config_location>/config.json:/opt/inky-mbta-tracker/config.json"
    ports:
      - 8000:8000
    environment:
      - "AUTH_TOKEN=<mbta_auth_token>"
      - IMT_CONFIG=/opt/inky-mbta-tracker/config.json
      - IMT_REDIS_ENDPOINT=<redis_endpoint>
      - IMT_REDIS_PORT=6379
      - "IMT_REDIS_PASSWORD=<redis_pass>"
      - "IMT_MQTT_HOST=<redis_host>"
      - "IMT_MQTT_USER=<mqtt_user>"
      - "IMT_MQTT_PASS=<mqtt_pass>"
A couple of notes…
- Consider embedding secrets in a better way than just in the docker compose file.
- An MBTA API token can be acquired at https://api-v3.mbta.com/.
- MQTT is optional but can be used to integrate with Home Assistant.
Config File
A config file in .json form is required. Here’s what the schema looks like:
{
  "stops": [
    {
      // REQUIRED, the stop ID which can be retrieved from the stop page like this example:
      // https://www.mbta.com/stops/place-davis
      "stop_id": "place-davis",
      // OPTIONAL, filter only arrivals going in this direction, typically 1 means that inbound
      // and 0 means outbound but that depends on the route
      // more info here: https://api-v3.mbta.com/docs/swagger/index.html#/Prediction/ApiWeb_PredictionController_index
      "direction_filter": "1",
      // OPTIONAL, filter only arrivals for the following route ID, useful if a subway station has
      // a bunch of bus routes that you don't care to track for example
      "route_filter": "Red",
      // REQUIRED, time to walk/drive/bike/etc to get to this station
      // this will be used by the display component to actually determine when
      // you can make an arrival
      "transit_time_min": 18
      // OPTIONAL, use this for stops that never have real-time departure information
      // (looking at you with side-eye, Medford-Tufts. This will spawn a different
      // task which retrieves static schedule information every couple of hours
    }
  ]
}
I hope the comments are instructive enough for you.
Rev up those fryers
Once you have your mounts & secrets setup, launch the server with a docker compose up -d.
Assuming you did things right, you should see logs like the following with docker compose logs:
INFO     action=reset time=Sun Dec 15 06:18:00 2024 route_id=Shuttle-MedfordNorthStation route_type=3 headsign=North Station (Shuttle) stop=College Ave @ Boston Ave id=schedule-Green-E-MedfordNorthStation-Sunday-a487b-0-06:18:18-2379-1, transit_time_min=15, alerting=False
INFO     action=reset time=Sun Dec 15 06:11:00 2024 route_id=Shuttle-MedfordNorthStation route_type=3 headsign=North Station (Shuttle) stop=College Ave @ Boston Ave id=schedule-Green-E-MedfordNorthStation-Sunday-a487b-0-06:11:55-2379-1, transit_time_min=15, alerting=False
INFO     action=reset time=Sun Dec 15 06:05:00 2024 route_id=Shuttle-MedfordNorthStation route_type=3 headsign=North Station (Shuttle) stop=College Ave @ Boston Ave id=schedule-Green-E-MedfordNorthStation-Sunday-a487b-0-06:05:32-2379-1, transit_time_min=15, alerting=False
If you’re seeing reset messages like those examples, then that means the application was able to connect with the MBTA API.
Prometheus
A few Prometheus metrics are exposed at http://localhost:8000/metrics:
from prometheus_client import Counter, Gauge

schedule_events = Counter(
    name="imt_schedule_events",
    documentation="Total MBTA Schedule Events that have been processed",
    labelnames=["action", "route_id", "stop"],
)

tracker_executions = Counter(
    name="imt_tracker_executions",
    documentation="Total executions of each MBTA tracker task",
    labelnames=["stop"],
)

mbta_api_requests = Gauge(
    name="mbta_api_requests",
    documentation="Total requests made to the MBTA API",
    labelnames=["endpoint"],
)
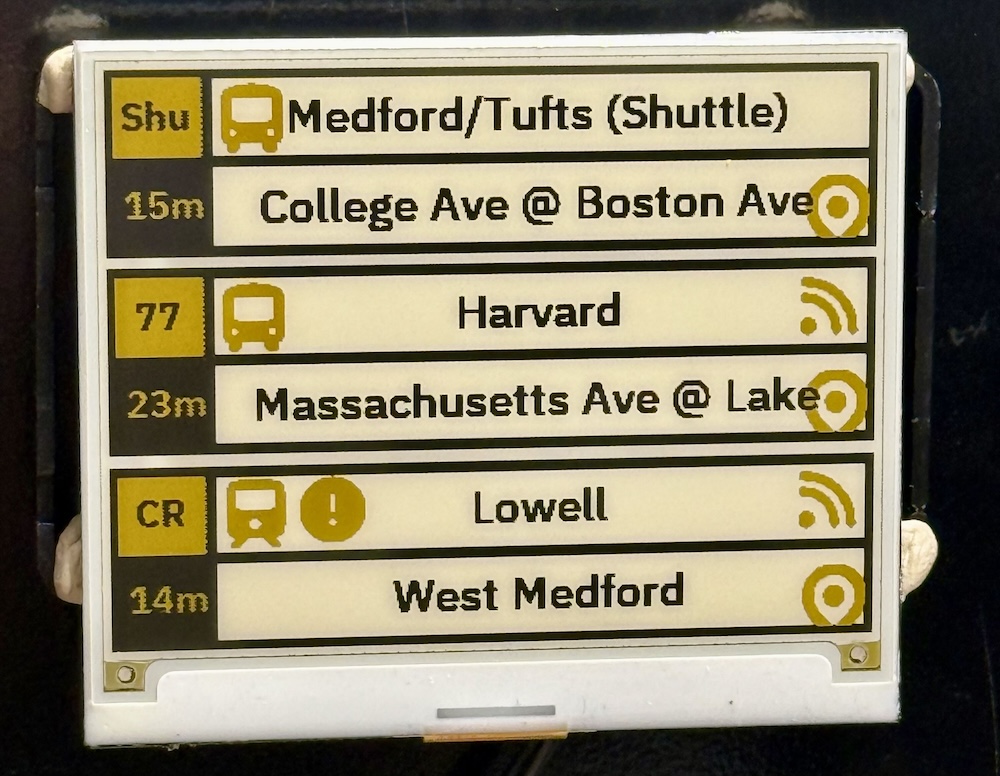
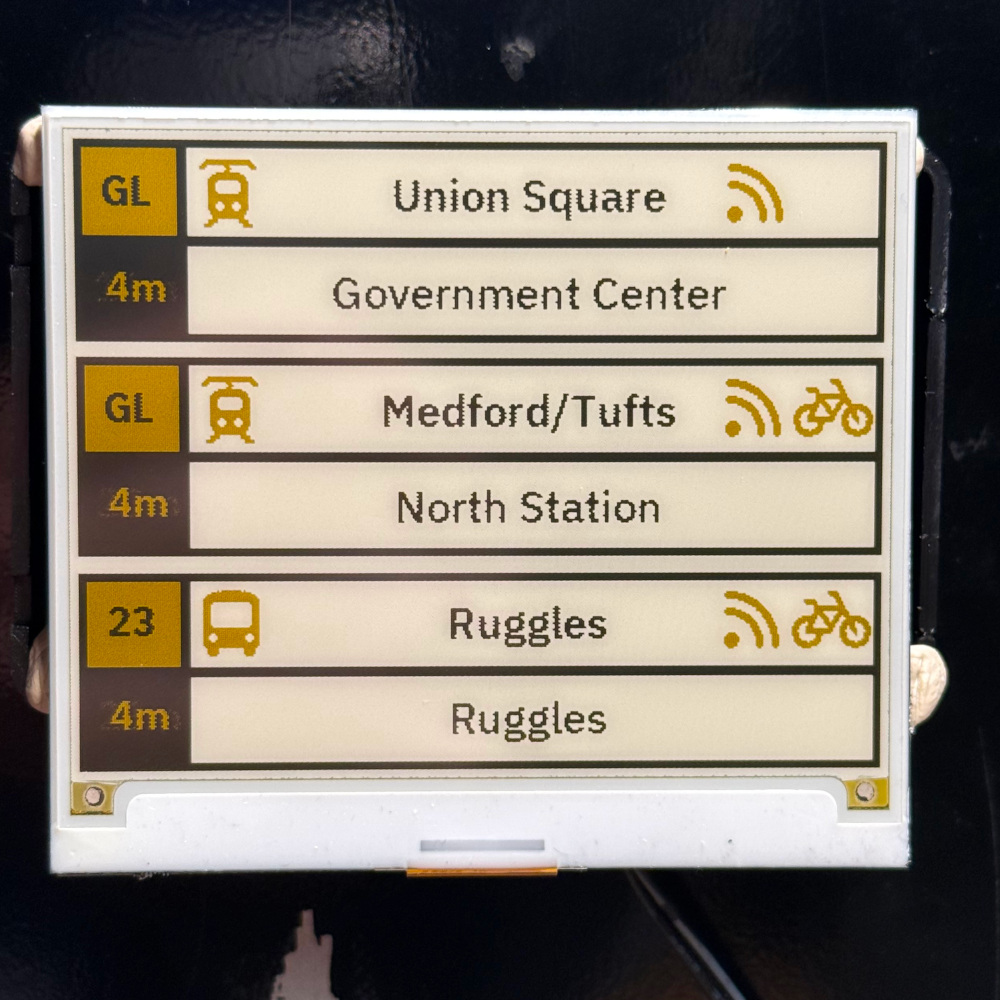
Display
The second component of this is the Inky wHAT display and Pi.
From, the inky-display Git:
Required Components
- Yellow Inky wHAT Display.
- Microcenter link to display
- Note: this is only yellow right now because I would have to change the colors otherwise to get red working. Black and white will not work.
- Compatible Raspberry Pi.
- Configured inky-mbta-tracker Redis accessible over the network.
- May I recommend Tailscale to bridge those gaps.
Setup
- Setting up your Pi & Inky wHAT is left to the reader.
- Create a
.envfile:
REDIS_HOST=<your_host_here>
REDIS_PORT=<port_num>
REDIS_PASS=<password>
- Create a virtual environment.
- Follow the I2C/SPI pre-req steps from the inky GitHub library README.
- Install Taskfile which is used in lieu of a Makefile.
- Run
task install-fontsto install the required fonts to thefonts/directory. - Run
task runto watch the display.
Conclusion
You can add a systemd service if you prefer for the display. The Docker services should run quietly although I may update the services over time with new functionality so keep an eye on the GitHub and consider pinning the tags.
If you have any feedback, questions, or suggestions then let me know in the comments.